- Reverb occupies a unique place in recording history. As soon as engineers recognised that recording instruments with microphones meant also capturing the spaces in which those recordings were made, two interesting paths led off in conflicting directions. One approach, for those wishing to maintain a live feel in their recordings, was to source the most acoustically suitable recording locations. The other path led to engineers creating dry recording spaces so that reverb could be artificially added at the mixing stage. Such spatial rebuilding was tasked to hardware reverbs, which provided user control over key parameters including reverb size, diffusion, how long the reverb tail lasted and so on. More recently, as computer-hosted effect plug-ins became viable, so reverb evolved, and a new approach to spatial effects processing arrived. Convolution reverbs allowed impulse responses—effectively "recordings" of real spaces—to be applied to source sounds, bringing new levels of realism to reverb treatments.
Accordingly, we've never had it so good. Both approaches to reverb can now sit side-by-side within our workstations, with plug-ins of both types offering advantages and disadvantages over the other. Waves H-Reverb now arrives, with the H standing for Hybrid. It attempts to offer the best of both worlds, providing a level of control you'd associate with artificial reverberation, founded on the kinds of impulse response foundations in convolution reverbs.
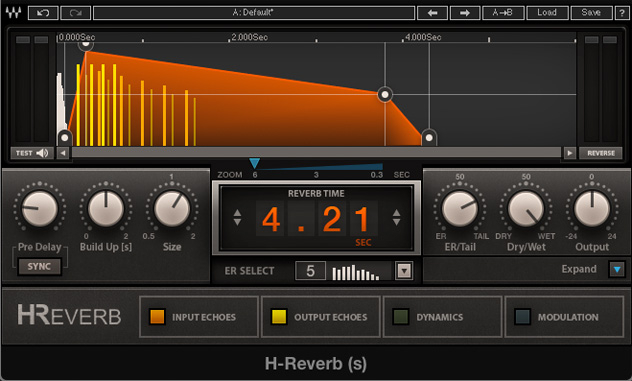 The interface is nicely designed. While there is plenty here to explore, nothing is too far away. By default, a smaller feature set is provided when the plug-in is instantiated, but a quick click on the Expand button on the right side shows the additional parameter modules available in the lower half. However, let's start at the top, as this is where the overall reverb shape is determined. Below the graphic display, which shows the reverb tail and other main parameters, you can adjust pre-delay time. This can either use time values of up to 500 milliseconds or, by enabling the Sync button below, it can neatly clock to adjust pre-delay in sync with your track's tempo. Next comes Build Up, another highly useful and to my knowledge unique parameter. This sets a kind of attack time to the reverb tail, adding a volume rise of up to two seconds, so that signals start drier and become wetter through the duration of the Build Up time. This is particularly effective on vocals, which can be dry and clear initially before becoming lusher and wetter later on. The final parameter here adjusts reverb size. The central section allows you to be specific about reverb time in seconds and to two decimal places, and underneath you can select an early reflection pattern from a drop-down menu of ten starting points. To the right of this section, you can set a balance between the early reflection and reverb stages, choose an overall dry/wet balance and tweak overall output level. Lastly, reverb can be instantly reversed by a click of the button below and to the right of the graphical display, further developing the sound design options.
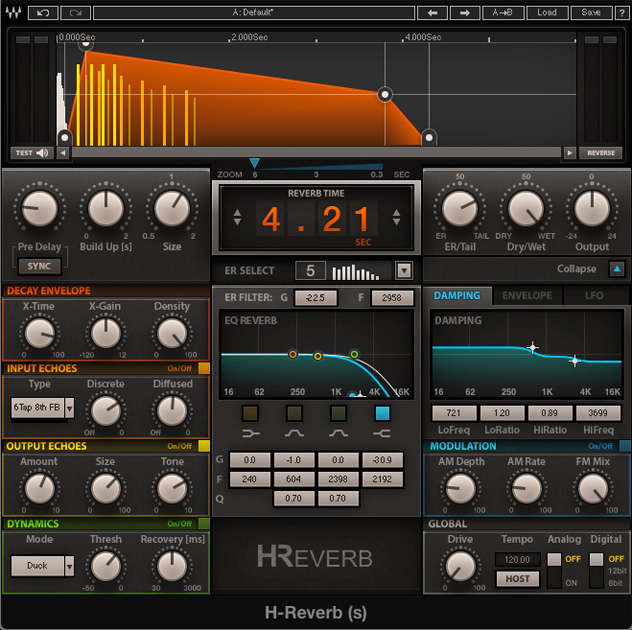 The fun starts underneath, however, with additional effects shaping offered on a modular basis. The four modules are labelled Input Echoes, Output Echoes, Dynamics and Modulation. These modules can be switched on or off in the basic view of the plug-in, but to tweak parameters, you'll need to expand the interface out to its full potential.
The first module you'll see helps shapes the reverb decay envelope, as represented by the graphical display at the top. The X-Time and X-Gain dials control the shape and volume of the reverb tail, though they're more intuitively tweaked by clicking and moving the crosshairs on the graphic display itself. However, reverb density is also controllable within the decay envelope section, which neatly increases the opacity of the orange reverb tail.
Then come the Echoes modules, with both input and output stages. The concept here isn't to provide a traditional delay unit within H-Reverb's skin; instead, within the Input Echoes module, the original signal is delayed before being sent to the reverb again and again, to effectively feed the reverb with additional signals to produce richer, lusher results. Similarly, the output reverb signal can also be built up by repeating delays, further diffusing and complicating the reverb response.
The Dynamics modules allow for three approaches to volume tailoring, to counter common problems associated with generous reverb treatments. A drop-down menu allows you to toggle between compression, ducking and de-essing, with a threshold dial setting a volume level above which the chosen effect will be introduced. Then, either a recovery time dial (compression and ducking) or a range dial (de-esser) further tailor your chosen treatment type.
A four-band EQ is provided in the middle of the interface to control the tonal response of the reverb you've configured, with two bell curves flanked by high and low shelves. The right side is devoted to more experimental sonic treatments. Above this, you can also shape the tonal response of Early Reflections via the ER filter, which controls the amount of high-frequency reflection offered back into the reverb from the virtual space you're designing.
On the right side towards the top, you can choose one of three time filters. The first, Damping, lets you control reverb time across two frequency zones, to extend or cut the reverb time of the treble against the bass, or vice versa. Meanwhile, the Envelope or LFO alternatives allow you to introduce resonant low- or high-pass filter movement to the signal, with the latter offering syncable speeds.
The modulation section introduces further movement, with the AM Depth and Rate dials letting you tweak stereo movement in the reverb tail, creating wider effects. If flanging or chorus are more your thing, these can be introduced via the FM Mix dial and while this provides only an amount control, it's sonically effective. Lastly, in the Global section, you can create additional grit, first by routing H-Reverb's output signal back to its input to add power and menace. Additionally, you can introduce analogue modelling and/or make things digitally crunchy with 8- or 12-bit bitcrushing.
Everything described above pertains to the main H-Reverb effect, but upon installation you'll find that a second effect, H-Reverb Long, is also added to your plug-in collection. The only difference here is that H-Reverb Long allows for reverb times of up to 12 seconds, double that of the main plug-in. The reason for offering this separately is that these longer reverb times demand up to 30% more CPU power. It's also worth saying that H-Reverb is as likely to appeal to those mixing music for films as it is those working as record producers; the surround version of the plug-in provides an additional module to shape reverb balances between the centre and front/rear speakers.
H-Reverb is an absolute joy to use—never has reverb sculpting felt quite as intuitive and bespoke as this. Just as impressively, despite the array of parameters offered, H-Reverb remains immediate and easy to understand, and it'd be hard to create a treatment that doesn't work for the sound you're processing. Though this is partly due to the unapologetically seductive and lush tone Waves have incorporated here, it's also because the moves you'll make to shape spatial treatments are, above all, musical. If you're looking for a reverb plug-in offering rich, warm tones coupled to bold yet relevant parameters for sonic manipulation, look no further.
Ratings:
Sound: 4.7
Cost: 3.8
Versatility: 4.2
Ease of use: 4.5
The fun starts underneath, however, with additional effects shaping offered on a modular basis. The four modules are labelled Input Echoes, Output Echoes, Dynamics and Modulation. These modules can be switched on or off in the basic view of the plug-in, but to tweak parameters, you'll need to expand the interface out to its full potential.
The first module you'll see helps shapes the reverb decay envelope, as represented by the graphical display at the top. The X-Time and X-Gain dials control the shape and volume of the reverb tail, though they're more intuitively tweaked by clicking and moving the crosshairs on the graphic display itself. However, reverb density is also controllable within the decay envelope section, which neatly increases the opacity of the orange reverb tail.
Then come the Echoes modules, with both input and output stages. The concept here isn't to provide a traditional delay unit within H-Reverb's skin; instead, within the Input Echoes module, the original signal is delayed before being sent to the reverb again and again, to effectively feed the reverb with additional signals to produce richer, lusher results. Similarly, the output reverb signal can also be built up by repeating delays, further diffusing and complicating the reverb response.
The Dynamics modules allow for three approaches to volume tailoring, to counter common problems associated with generous reverb treatments. A drop-down menu allows you to toggle between compression, ducking and de-essing, with a threshold dial setting a volume level above which the chosen effect will be introduced. Then, either a recovery time dial (compression and ducking) or a range dial (de-esser) further tailor your chosen treatment type.
A four-band EQ is provided in the middle of the interface to control the tonal response of the reverb you've configured, with two bell curves flanked by high and low shelves. The right side is devoted to more experimental sonic treatments. Above this, you can also shape the tonal response of Early Reflections via the ER filter, which controls the amount of high-frequency reflection offered back into the reverb from the virtual space you're designing.
On the right side towards the top, you can choose one of three time filters. The first, Damping, lets you control reverb time across two frequency zones, to extend or cut the reverb time of the treble against the bass, or vice versa. Meanwhile, the Envelope or LFO alternatives allow you to introduce resonant low- or high-pass filter movement to the signal, with the latter offering syncable speeds.
The modulation section introduces further movement, with the AM Depth and Rate dials letting you tweak stereo movement in the reverb tail, creating wider effects. If flanging or chorus are more your thing, these can be introduced via the FM Mix dial and while this provides only an amount control, it's sonically effective. Lastly, in the Global section, you can create additional grit, first by routing H-Reverb's output signal back to its input to add power and menace. Additionally, you can introduce analogue modelling and/or make things digitally crunchy with 8- or 12-bit bitcrushing.
Everything described above pertains to the main H-Reverb effect, but upon installation you'll find that a second effect, H-Reverb Long, is also added to your plug-in collection. The only difference here is that H-Reverb Long allows for reverb times of up to 12 seconds, double that of the main plug-in. The reason for offering this separately is that these longer reverb times demand up to 30% more CPU power. It's also worth saying that H-Reverb is as likely to appeal to those mixing music for films as it is those working as record producers; the surround version of the plug-in provides an additional module to shape reverb balances between the centre and front/rear speakers.
H-Reverb is an absolute joy to use—never has reverb sculpting felt quite as intuitive and bespoke as this. Just as impressively, despite the array of parameters offered, H-Reverb remains immediate and easy to understand, and it'd be hard to create a treatment that doesn't work for the sound you're processing. Though this is partly due to the unapologetically seductive and lush tone Waves have incorporated here, it's also because the moves you'll make to shape spatial treatments are, above all, musical. If you're looking for a reverb plug-in offering rich, warm tones coupled to bold yet relevant parameters for sonic manipulation, look no further.
Ratings:
Sound: 4.7
Cost: 3.8
Versatility: 4.2
Ease of use: 4.5