- FXpansion's DCAM Synth Squad package has proved enormously popular with sound designers and producers the world over but, as well as spawning a range of specialist instruments, several coveted technologies were included within the package. No surprise then that the technology exploited in that bundle has given birth to a range of other products built from the same sonic foundations. The most recent of these is drum programming instrument Tremor. Hot on its heels is Etch, which takes the comprehensive filter section of DCAM and repackages it as a plug-in effect which features the additional option of working as a MIDI-controllable instrument effect, bringing a level of real-time "playability" lacking in many of Etch's rivals.
Etch features a GUI whose styling will be familiar to those who've spent time with FXpansion's more recent plug-ins, particularly Geist, with heavy use of grey and light greeny-brown. Effectively, the interface is split into four layers, which are represented as rows of functions. The top row, the Global area, allows you to select presets from a drop-down menu, select High Pass Side Chain Mode, enable Oversampling (to reduce potential aliasing) and access the MIDI Learn functions which, in a similar way to Ableton Live's routings, immediately display all MIDI map-able parameters and allow you to assign them to hardware controllers of your choice.
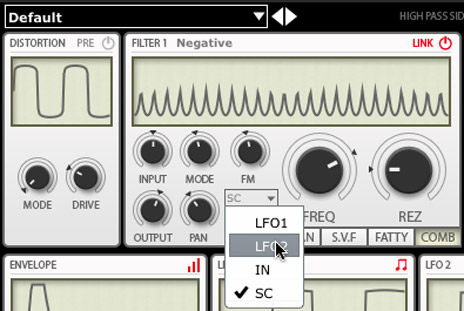
 The second row of modules controls the Audio Signal Path, with multi-mode pre- or post-processing distortion the first module in the top left-hand corner. Seven distortion types are available, with a Drive dial controlling how much grit you'll hear, though do be sure to enable the module via its red power dial before you can expect to hear any results. Following Distortion comes the first of the twin resonant filters which offers four separate modes which, in turn, vary the number of filter types available. These are Japan (modeled on Japanese monosynths), SVF (a more typical, variable state filter), Fatty (OTA-based, Sallen-Key type) and Comb (with positive and negative settings). Between the modes, a huge variety of filter types are available, from more common 2- and 4-pole low-pass options to less common Peak and Notch curves to name but a few.
The first filter offers Input Level, Filter Mode, FM Amount, Output Level, Pan, Cutoff Frequency and Rez (resonance) amounts via rotary dials, as well as a drop-down menu to allow you to configure internal or external modulation sources, of which more shortly. Filter 2 is virtually identical to Filter 1 with filter relationships offered via either Series or Parallel modes. Additionally, the filters can be linked so that changes to filter 1 also affect those in filter 2 but with the added benefit of offsets, such as to those for cutoff frequency, being preserved wherever possible. Two additional modules complete the Audio Signal Path, in the form of the Compressor and the Output module. The Compressor offers a one-dial approach to dynamics processing, with additional Soft and Hard Knee options. At the Output stage, you can blend dry and wet signals with the Mix dial, as well as control final volume with the Level knob.
The modules below this row allow you to control internal modulation routings with a good number of options available. These include Envelope, two LFOs and additional Envelope Follower, a Sample and Hold module and an X-Y controller. Which of these are available depends on whether you're using a Etch as a "static" audio processing controller via an insert, or whether you're using it as a MIDI-controllable effect via a side-chained input.
The second row of modules controls the Audio Signal Path, with multi-mode pre- or post-processing distortion the first module in the top left-hand corner. Seven distortion types are available, with a Drive dial controlling how much grit you'll hear, though do be sure to enable the module via its red power dial before you can expect to hear any results. Following Distortion comes the first of the twin resonant filters which offers four separate modes which, in turn, vary the number of filter types available. These are Japan (modeled on Japanese monosynths), SVF (a more typical, variable state filter), Fatty (OTA-based, Sallen-Key type) and Comb (with positive and negative settings). Between the modes, a huge variety of filter types are available, from more common 2- and 4-pole low-pass options to less common Peak and Notch curves to name but a few.
The first filter offers Input Level, Filter Mode, FM Amount, Output Level, Pan, Cutoff Frequency and Rez (resonance) amounts via rotary dials, as well as a drop-down menu to allow you to configure internal or external modulation sources, of which more shortly. Filter 2 is virtually identical to Filter 1 with filter relationships offered via either Series or Parallel modes. Additionally, the filters can be linked so that changes to filter 1 also affect those in filter 2 but with the added benefit of offsets, such as to those for cutoff frequency, being preserved wherever possible. Two additional modules complete the Audio Signal Path, in the form of the Compressor and the Output module. The Compressor offers a one-dial approach to dynamics processing, with additional Soft and Hard Knee options. At the Output stage, you can blend dry and wet signals with the Mix dial, as well as control final volume with the Level knob.
The modules below this row allow you to control internal modulation routings with a good number of options available. These include Envelope, two LFOs and additional Envelope Follower, a Sample and Hold module and an X-Y controller. Which of these are available depends on whether you're using a Etch as a "static" audio processing controller via an insert, or whether you're using it as a MIDI-controllable effect via a side-chained input.
 In terms of internal routings, to set, for instance, LFO1 to control Filter 1's Cutoff, you'd first choose Rate, Shape, Morph, Phase and Gain amounts from LFO1's sliders, then select LFO1 as the control source within Filter 1's drop-down menu. A red area around the filter Cutoff can then be scaled to control the range of this routing, with a black triangle jumping or sliding around the outside showing you the current position of the Cutoff frequency within this range. Setting up multiple sources to control the same parameter is perfectly possible—simply select a different source from the drop-down menu and go again.
The LFOs both offer a wide range of tweak-able shapes and, of course, their rates clock effortlessly to the host tempo of your project, but for wilder, less predictable shapes, the S+H module is your best bet, as this achieves wonderfully random results which keep you guessing. If MIDI control is your thing and your DAW allows it, the Envelope stage comes alive as it's triggered via C#-2 on MIDI channel 1, giving you access to an A-H-D envelope which is controlled by however long you hold a key down before the Decay stage takes over. Equally, the LFOs are reset via key triggers taking them back to the beginning of their phase cycles, while a range of MIDI keys are set up to control LFO rates. The Envelope Follower can either track the main audio source or "listen" to a side-chain input, if your DAW allows one to be routed in. Finally, the X-Y controller can be mapped to an equivalent physical device very easily, while it's possible to map its axes to the parameters you want, allowing you to tweak filter settings on the fly.
In use, Etch is a sonic treat. It provides tone-shaping tools in abundance, whether you're looking for static treatments or hugely dynamic ones which shift and warp to make even the most repetitive loops and patterns come alive with sonic detail. My favourite feature is the Sample and Hold module which lets you interrupt one or both filters with random patterns to keep them jumping unpredictably as a mix plays through and, in combination with beat-repeat style effects quickly turns even 1-bar loops into glitchy mayhem, all beautifully locked to tempo. This is just one of several great features, though. Also consider its attractive price point and I'd have no hesitation in recommending Etch to producers of any genre.
Ratings:
Cost: 4.5/5
Ease of use: 4/5
Versatility: 4/5
Sound: 4.5
In terms of internal routings, to set, for instance, LFO1 to control Filter 1's Cutoff, you'd first choose Rate, Shape, Morph, Phase and Gain amounts from LFO1's sliders, then select LFO1 as the control source within Filter 1's drop-down menu. A red area around the filter Cutoff can then be scaled to control the range of this routing, with a black triangle jumping or sliding around the outside showing you the current position of the Cutoff frequency within this range. Setting up multiple sources to control the same parameter is perfectly possible—simply select a different source from the drop-down menu and go again.
The LFOs both offer a wide range of tweak-able shapes and, of course, their rates clock effortlessly to the host tempo of your project, but for wilder, less predictable shapes, the S+H module is your best bet, as this achieves wonderfully random results which keep you guessing. If MIDI control is your thing and your DAW allows it, the Envelope stage comes alive as it's triggered via C#-2 on MIDI channel 1, giving you access to an A-H-D envelope which is controlled by however long you hold a key down before the Decay stage takes over. Equally, the LFOs are reset via key triggers taking them back to the beginning of their phase cycles, while a range of MIDI keys are set up to control LFO rates. The Envelope Follower can either track the main audio source or "listen" to a side-chain input, if your DAW allows one to be routed in. Finally, the X-Y controller can be mapped to an equivalent physical device very easily, while it's possible to map its axes to the parameters you want, allowing you to tweak filter settings on the fly.
In use, Etch is a sonic treat. It provides tone-shaping tools in abundance, whether you're looking for static treatments or hugely dynamic ones which shift and warp to make even the most repetitive loops and patterns come alive with sonic detail. My favourite feature is the Sample and Hold module which lets you interrupt one or both filters with random patterns to keep them jumping unpredictably as a mix plays through and, in combination with beat-repeat style effects quickly turns even 1-bar loops into glitchy mayhem, all beautifully locked to tempo. This is just one of several great features, though. Also consider its attractive price point and I'd have no hesitation in recommending Etch to producers of any genre.
Ratings:
Cost: 4.5/5
Ease of use: 4/5
Versatility: 4/5
Sound: 4.5